How to program an Arduino using Rust (on macOS)
I have a confession to make – in all honesty, I’m not much of a hardware hacker. In my teens, whenever I got home from school, I gravitated more often to coding (or video games) than soldering or robotics.
But I spent a lot of my childhood playing with Snap Circuits and redstone circuits in Minecraft, so I can appreciate the charm. You’re automating things - taking small atoms and combining them into something bigger. Just like code can be written to do whatever you want, so can hardware – and there’s something more visceral to it since your creations takes up space in the real world. I dig that.
In an effort to challenge myself (and have a bit of fun), I recently picked up an Arduino, and it’s sparked a lot of the same joy I had when I first started building with LEGOs as a kid or programming as a teen. The Arduino is pretty accessible to newbies - so once I got my board working, it felt natural that as my first task, I’d write a program for it in Rust, since Rust is a pretty hot language for embedded systems programming these days.
The process for getting this working hasn’t been too complicated, but there’s some setup required to get it working on macOS, so I thought I’d take some notes and share my learning process in case it helps anyone else.
Onwards!
Note: This isn’t an introduction to Arduino. If it’s your first time using one, I recommend following the official tutorials that will guide you on setting yours up and uploading simple programs using the Arduino IDE. Once you feel comfortable with that, feel free to come back here!
Note: This also isn’t an introduction to Rust. For that, I recommend checking out the Rust book.
Preparation
The “Hello World” of the embedded programming world is to get an LED blinking - so that’s what our first Rust-based Arduino program will do.
Arduino chips are based on a family of microcontrollers called AVR. To compile Rust programs to work on these chips, we’ll need to install some build tools specifically for compiling to the chips’ instruction sets.
First, you’ll need a nightly Rust compiler for compiling Rust code for AVR.
After rustup is installed (if you don’t have it already), you can install the nightly compiler with:
rustup toolchain install nightly
You’ll also want to have XCode tools set up, if you haven’t already:
xcode-select --install
Next we’ll install some AVR-related tools using homebrew:
brew tap osx-cross/avr
brew install avr-gcc avrdude
avr-gcc is a compiler that can take C code and create a binary source that can be uploaded to an AVR microcontroller. avrdude is a program for uploading programs to AVR microcontrollers (a process often called “flashing”).
We’ll also install a CLI called ravedude which makes it possible to flash to your board as part of your usual cargo workflow:
cargo +stable install ravedude
Writing Rust
(spoiler: there won’t actually be much actual coding in this section)
The most well supported crate for programming Arduino embedded devices is a crate named arduino-hal, located in this repo.
You can create a starter project by running:
cargo install cargo-generate
cargo generate --git https://github.com/Rahix/avr-hal-template.git
You’ll be prompted to answer a few questions, and then it’ll create a project for you.
Once you’ve opened it, all you should need to do is cargo run to build and flash the application to your board.
ravedude automatically figures out the serial port your device is connected to which is pretty convenient.
Congrats - if your starter code was the same as mine, then your device should now be blinking:
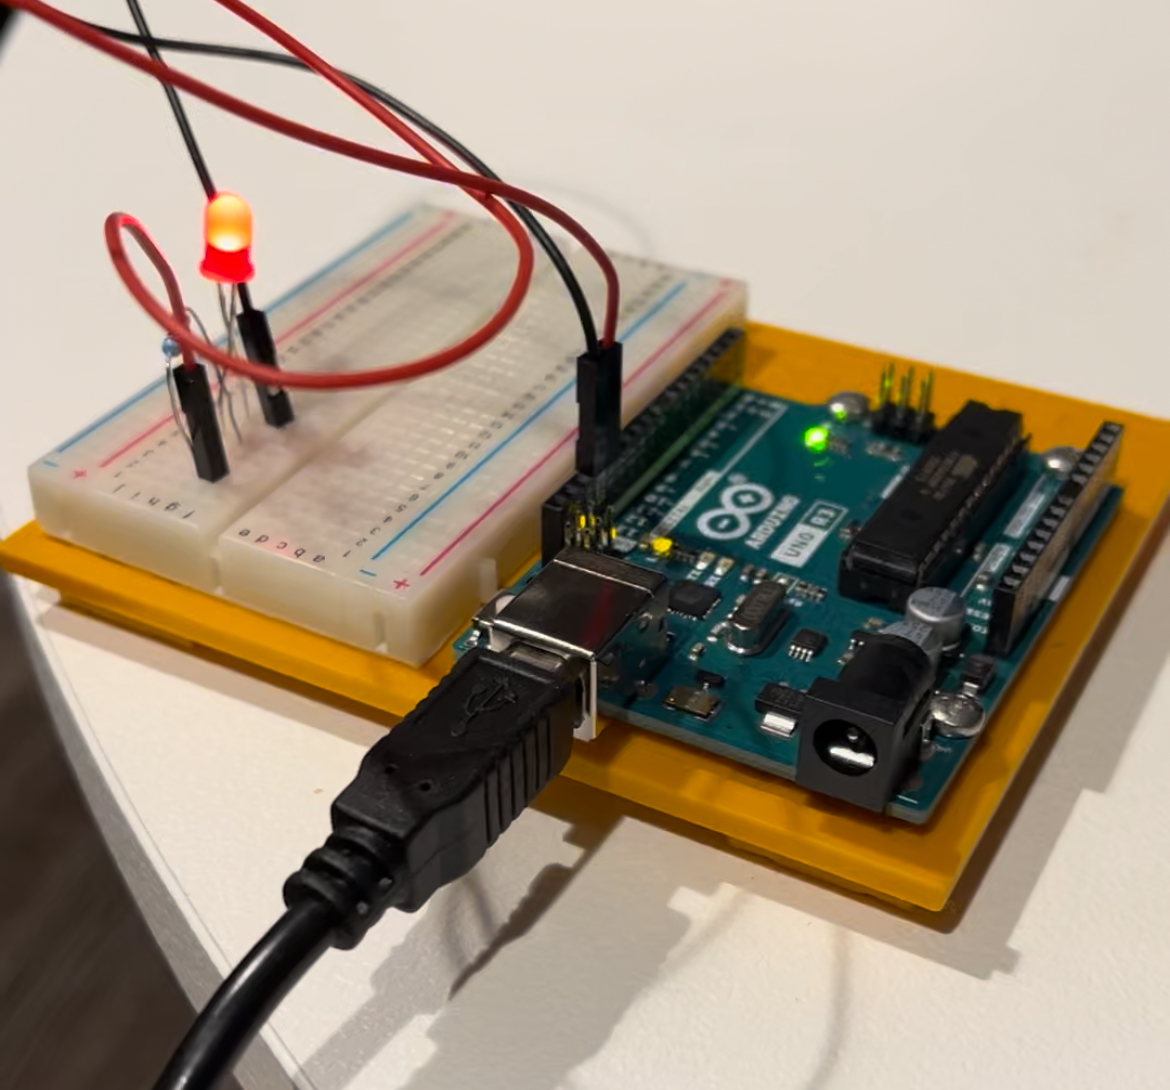
External LED optional.
At this point, we can probably say we’re done - but we haven’t really peaked at the Rust code, so the rest of the post will go into some more depth about what’s happening in the starter program.
Understanding the code
The started program created by the template should look something like this:
#![no_std]
#![no_main]

use panic_halt as _;

#[arduino_hal::entry]
fn main() -> ! {
    let dp = arduino_hal::Peripherals::take().unwrap();
    let pins = arduino_hal::pins!(dp);

    let mut led = pins.d13.into_output();

    loop {
        led.toggle();
        arduino_hal::delay_ms(1000);
    }
}
There’s a good chunk of boilerplate here, but for educational purposes it’s interesting to understand what each line is doing to contribute to the overall program since many parts of it will be common to a lot of embedded Rust code.
no_std
Let’s start with the first line:
#![no_std]
This tells the Rust that we want to compile our program without all of the standard library’s built-in APIs (like file system functions, collection types, and so on) available by default.
Instead only the types and functions from core (a subset of std) will be available.
In embedded programming, we want our compiled code to be as tiny as possible, so this mode makes it easier to ensure our program only includes the bare essentials.
For example, no_std programs disallow heap allocation by default.
This means if your program doesn’t need to dynamically allocate any memory (common in embedded programming), then a memory allocator won’t be included in the final program.
If you try using a third party crate that relies on the standard library, then the compiler will typically give you compiler errors indicating the faulty use of
std.error[E0463]: can't find crate for `std` --> /Users/rybickic/.cargo/registry/src/index.crates.io-6f17d22bba15001f/num-traits-0.2.18/src/lib.rs:23:1 | 23 | extern crate std; | ^^^^^^^^^^^^^^^^^ can't find crate | = note: the `avr-atmega328p` target may not support the standard library = help: consider building the standard library from source with `cargo build -Zbuild-std`Fortunately, many crates in the Rust ecosystem work with
no_stdeither out-of-the-box or through dedicated crate features, so it seems like this style of programming is decently well supported.
no_main
Moving on. The next line is:
#![no_main]
This is a directive telling the compiler that the program will be compiled without a main function, so we don’t want Rust to yell at us about it.
This might be confusing at first since the program does appear to have a function named main, but it turns out this function gets replaced by the #[arduino_hal::entry] macro coming before it.
Since we’re using arduino_hal as a framework, it’s not that important to for us to understand its internals.
But since I was curious, I used cargo-expand to see what the code was transformed into to after Rust expanded all of the macros.
Running cargo expand on the initial program yields:
#![feature(prelude_import)]
#![no_std]
#![no_main]
#[prelude_import]
use core::prelude::rust_2021::*;
#[macro_use]
extern crate core;
extern crate compiler_builtins as _;
use panic_halt as _;
#[doc(hidden)]
#[export_name = "main"]
pub unsafe extern "C" fn __avr_device_rt_main_trampoline() {
    __avr_device_rt_main()
}
#[doc(hidden)]
fn __avr_device_rt_main() -> ! {
    let dp = arduino_hal::Peripherals::take().unwrap();
    let pins =
        ::arduino_hal::Pins::with_mcu_pins(::atmega_hal::Pins::new(dp.PORTB, dp.PORTC, dp.PORTD));
    let mut led = pins.d13.into_output();
    loop {
        led.toggle();
        arduino_hal::delay_ms(1000);
    }
}
If we squint our eyes a bit we can see the function is rewritten to another name, and an extern function is created, presumably so that another program can run or link to our code. (If you know more about how this works, I’d be more than curious to know.)
Panic handler
The following line, use panic_halt as _; defines a panic handler which tells Rust that if any code panics, we just want the program to busy-loop.
The reason we need this that when a no_std or embedded program panics, there often isn’t a standard output to raise a message or print a stack trace to, so Rust requires us to specify how to handle the these situations.
Entrypoint
Finally, we have our program’s entrypoint:
#[arduino_hal::entry]
fn main() -> ! {
    // snip
}
We already explained in a previous section how the #[arduino_hal] macro gets expanded and transforms the main function – but what’s the deal with the return type?
!, also called never, is a special type in Rust that represents the type of any value that never resolves.
When ! is used as a return type, this means the function never returns (it loops forever).
Arduino programs are expected to run forever - they run as long as your chip is powered on.
Since the Rust program only has a single function named main, using ! as a return type allows the compiler to enforce this contract, and raise any errors to us if it detects that our function might exits prematurely.
(Neat!)
Function body
Finally, we have the guts of our actual program.
let dp = arduino_hal::Peripherals::take().unwrap();
let pins = arduino_hal::pins!(dp);

let mut led = pins.d13.into_output();

loop {
    led.toggle();
    arduino_hal::delay_ms(1000);
}
Here we’re using a HAL, or Hardware Abstraction Layer, to interact with all of the device features of our chip.
Specifically, we’re using arduino-hal (docs).
These are high level APIs that reduce the extent to which we have to read and understand the 300+ page datasheets associated with our chips.
Datasheets are what have all of the technical goodies about a chip’s features, pin configurations, CPU and memory behavior, electrical characteristics, and more. They make for fun reading on the beach.
Here are the data sheets for the Arduino UNO R3, and its microcontroller, the ATmega328P:
In the program’s body, we call Peripherals::take to obtain unique access to the device’s peripherals, and then use arduino_hal::pins! to obtain the device’s pins from the peripherals.
Afterwards, we set one of the pins as an output (some pins can be configured as either inputs or outputs), and start a loop that toggles the pin’s state and sleeps for a second within a loop.
The code here is pretty simple, but it’s worth highlighting what we didn’t have to do. We didn’t have to poke and set individual memory addresses, we didn’t have to worry about incorrect initialization state, and we didn’t have to worry about peripherals getting configured out of order. All of these kinds of sharp edges were smoothed out by the zero-cost abstractions provided by the HAL.
Closing
I hope these notes were useful. If you discover any glaring errors, please don’t hesitate to reach out and let me know.
Happy hacking!
Further resources
- avr-hal examples - The
avr-halrepo has dozens (hundreds?) of examples of various sample programs for programming arduino devices. - An Overview of the Embedded Rust Ecosystem - This video provides an great introduction to Rust’s embedded programming ecosystems, explaining how microcontrollers are controlled at the lowest level (by setting various bytes in memory) and how different kinds of Rust crates solve different development issues by shifting responsibilities from runtime to compile time or by making embedded device code more interoperable.
- The Embedded Rust Book - An introductory book about using Rust on embedded systems.
- USART, UART, RS232, USB, SPI, I2C, TTL, etc. what are all of these and how do they relate to each other? - A helpful StackOverflow thread covering some terminology thrown around in the embedded programming space that I didn’t know about as a newbie.